Tag Archives: baking

Kitchen adventures: festive rice krispies treats

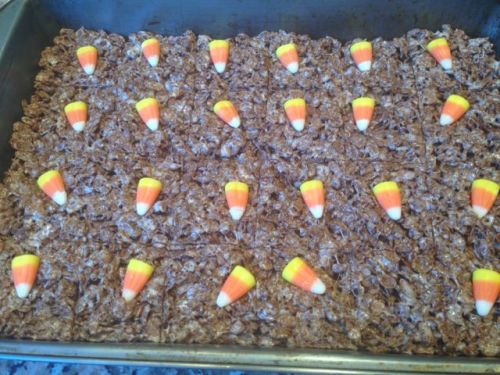
Up until last week, I was pretty much a rice krispies treat hater. I’ve always sworn by the fact that stirring cereal into melted butter and marshmallows is a poor excuse for “baking,” and considering they’re chocolate-free, a bite of one of these can be completely forgettable. Then, my friend Natalie gave me the genius idea of switching up the original recipe for Smitten Kitchen’s salted brown butter rendition, using Cocoa Krispies instead of Rice Krispies, and adding orange candy to make something festive for Halloween. When my friend Katie turned to me to say “these are different, and they’re really f*ing good” at the Halloween potluck where I unleashed the finished product, I knew that this American-born baked good and I had turned a new leaf. The opportunities to elevate this simple, three-ingredient classic into a creative and delicious dessert are surprisingly endless. I was blind, but now I see.

Halloween treats!

Halloween treats!

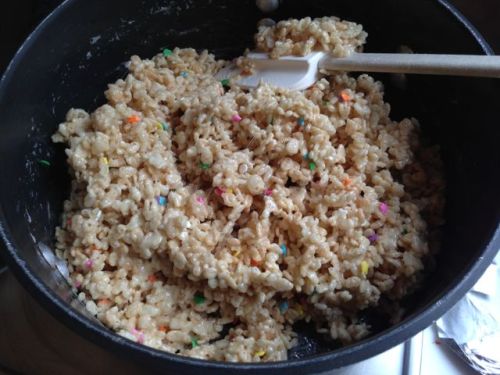
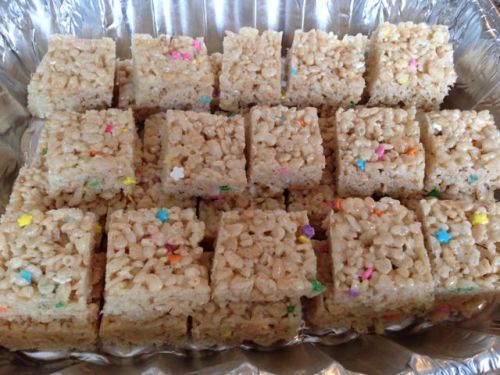
After the epiphany, I couldn’t wait to try a different variation of the recipe for my friend Leah’s birthday this weekend. And I have to admit I got the inspiration from the adorable ones I saw at SusieCakes, which had specks of fall leaf sprinkles. I altered the Smitten Kitchen recipe only slightly, adding 6 tablespoons as opposed to an entire stick of butter (the original recipe on the cereal box calls for 3), and throwing in festive birthday sprinkles with the cereal. Within minutes I had whipped up a treat that was adorable and absolutely addictive.

mixing in the krispies and sprinkles

mixing in the krispies and sprinkles

perfect birthday treats

perfect birthday treats

The recipe can be found here, is very easy to follow, and upgrades the original in a MAJOR way. Any mix-ins should be added with the Rice Krispies so they don’t melt. I suggest cutting with a thin sharp knife, and if you’re really obsessive like me, cutting a millimeter of the outer edge to outfit each square with four perfectly straight edges. I’m so glad I discovered a new go-to, simple recipe for potluck events – I hope you’ll try this!

Leave a comment

Filed under Erin's Favorites, Kitchen Adventures, Sugar Surge

Kitchen Adventures: Vegan Zucchini Bread

vegan zucchini bread with non vegan butter

In the middle of the week I finally decided to compensate for my lack of routine baking this holiday season. My favorite thing about winter is the excuse to stay inside all day to whip up a batch of cookies or try out a new recipe. With a goal of making use of some of the unique items in my fridge such as zucchini, carrots, and a random assortment of other vegetables and fruits, I searched the web for a good bread recipe. When most of them called for tons of butter and eggs, I decided to go vegan to prevent me from having to haul three blocks to get fresh ingredients from the store.

in pan

I only trust online recipes with photos or tons of reviews. I came across the perfect one for Zucchini Bread on allrecipes.com – the reviews were all positive AND there were photos. After scrutinizing the recipe and the comments, I decided to cut down the sugar, substitute whole wheat flour for all purpose, and add carrot in addition to the zucchini. The scent in my apartment as it baked was mesmerizing, and after 70 minutes of baking, I could finally cut a slice to taste. While it isn’t as soft and buttery as an Ina Garten or Paula Deen recipe might be, I would never guess the recipe is completely animal product free. It’s delicious, subtly sweet, and toasted with a little butter, it just might become my go-to breakfast for the next few days (and is also just proof that I could never be a real vegan).

Before

After

Vegan Zucchini Bread

Ingredients
3 cups all-purpose flour
3 tablespoons flax seeds (optional)
1 teaspoon salt
1 teaspoon baking soda
2 teaspoons ground cinnamon
1/2 teaspoon baking powder
1/2 teaspoon arrowroot powder (optional)
1 cup unsweetened applesauce
1 cup white sugar
1 cup packed brown sugar
3/4 cup vegetable oil
2 teaspoons vanilla extract
2 1/2 cups shredded zucchini

Directions

  1. Preheat oven to 325 degrees F (165 degrees C). Grease and flour two 9×5 inch loaf pans. Whisk together the flour, flax seeds, salt, baking soda, cinnamon, baking powder, and arrowroot in a bowl until evenly blended; set aside.
  2. Whisk together the applesauce, white sugar, brown sugar, vegetable oil, and vanilla extract in a bowl until smooth. Fold in the flour mixture and shredded zucchini until moistened. Divide the batter between the prepared loaf pans.
  3. Bake in the preheated oven until a toothpick inserted into the center comes out clean, about 70 minutes. Cool in the pans for 10 minutes before removing to cool completely on a wire rack.

1 Comment

Filed under Kitchen Adventures

Kitchen Adventures: Roasted Sweet Potato Cheesecake

Apologies for my hiatus – I just returned from a quick food-filled trip in London with my friend Sarah, and have since been in San Francisco continuing my feast with my family for Turkey Day. Despite spending 20% of the last five days exhausted on a plane, I arrived in my hometown ready to assume my role as my family baker and tackle  the sweet potato cheesecake recipe I had filed away last year after having a mad love affair with the masterpiece at Sonia’s house. I’m traditionally not a fan of cheesecake. I admit I am a cheese addict, but eating a warm, fluffy chocolate cake always wins outs over struggling through a dense sticky cheese cake after a big meal. But the second I took a bite of Sonia’s mom’s airy, lightly aromatic cake, which was covered with a generous heap of light maple cream, I became determined to make it for the next big family occasion.

cheesecake pre-whipped cream

Post cream topping

Fortunately, my five full hours of sleep on my plane ride back from London prepared me well to take on the task of making my first ever cheesecake with a spring-form pan, also a foreign object. As a self-proclaimed baker, I am ashamed to admit my inexperience with baking cheesecakes, but I’ve always been more inclined to create flour based treats. No longer. After whipping up the cheesecake in minutes and having it disappear within hours of stuffing our faces with turkey, I am making this Sweet Potato Cheesecake each November for the rest of my life. The buttery pecan crust is dense and delicious enough to be served as a cookie on its own. I would never guess that whipped cream would compliment a cake so dairy-laden already, but it actually rounded out the entire dessert as an ice cream would a birthday cake. I can confidently say that this is the best cheesecake I’ve had – I can’t wait to eat another slice this afternoon (after I digest last night’s feast, pictured below).

Traditional Bellsey Holiday Meal

The recipe calls for one cup of roasted sweet potato, but in the future, I’ll use a cup and a half to deepen the sweet potato flavor.  And if you don’t have a spring form pan, I suggest buying a cheap one – it makes slicing this thing a breeze. Also – to add the cinnamon leaf design, it’s simple – just draw out a stencil on a piece of paper, and sprinkle the cinnamon in the cut out!

Roasted Sweet Potato Cheesecake (from Sunset Magazine)

Ingredients

  • 2 dark orange-fleshed sweet potatoes (1 1/4 to 1 1/2 lb. total), such as jewel or red garnet (sometimes sold as yams)
  • 1 tablespoon melted butter
  • Pecan Crust (recipe follows)
  • 2 teaspoons lemon juice
  • 3 packages (8 oz. each) cream cheese, regular or light (neufchâtel), at room temperature
  • 3/4 cup granulated sugar
  • 1/2 cup firmly packed light brown sugar
  • 4 large eggs
  • 1/4 cup whipping cream
  • 1/4 cup sour cream
  • 1/4 cup maple syrup
  • 1 1/2 teaspoons ground cinnamon
  • 1 teaspoon ground nutmeg
  • 1/2 teaspoon ground ginger
  • Maple Cream (recipe follows)

Preparation

1. Preheat oven to 375° (convection not recommended). Peel sweet potatoes and cut in half lengthwise. Place in a 9- by 13-inch baking pan and brush with melted butter. Bake until potatoes are soft when pressed, 45 to 55 minutes.

2. Meanwhile, prepare crust. Bake in same oven with potatoes until lightly browned all over, 10 to 12 minutes.

3. Scrape any charred spots off potatoes, then cut potatoes into chunks. Whirl in a food processor or mash in a bowl with lemon juice until smooth. Reserve 1 cup; save any extra for another use.

4. Reduce oven temperature to 325°. In a bowl, with a mixer on high speed, beat cream cheese until fluffy. Gradually beat in granulated and brown sugars, scraping down sides of bowl occasionally, until mixture is well blended and smooth. Beat in eggs, one at a time, until blended. Add reserved sweet potato mixture, the whipping cream, sour cream, maple syrup, cinnamon, nutmeg, and ginger. Mix on low speed until well blended.

5. Wrap bottom of cheesecake pan with heavy-duty foil, pressing it up the sides. Pour batter over crust. Put cheesecake pan in a 12- by 15-inch roasting pan at least 2 inches deep. Set pans in oven and pour enough boiling water into roasting pan to come halfway up sides of cheesecake pan.

6. Bake until cake barely jiggles in the center when gently shaken, about 55 minutes. Remove pans from oven. Lift cheesecake pan from roasting pan and let cool completely on a rack, about 1 hour, then chill until cold, at least 1 1/2 hours, or up to 3 days (cover once cold).

7. Up to 6 hours before serving, cut around inside of pan rim to release cake; remove rim. With a pastry bag, pipe dollops of maple cream onto cake. Or serve maple cream separately, to spoon onto each wedge.

Pecan Crust: Whirl 1/4 cup coarsely chopped pecans in a blender until finely ground; you should have 1/4 cup. In a bowl, mix pecans, 1 1/4 cups fine graham cracker crumbs, 2 tablespoons sugar, and 5 tablespoons melted butter. Pour into a 9-inch cheesecake pan with removable rim (2 1/4 in. tall). Press mixture evenly over bottom of pan.

Maple Cream: In a bowl, with a mixer on high speed, beat 3/4 cup whipping cream until stiff peaks form. On low speed, beat in 1/4 cup maple syrup just until blended.

You can make this cheesecake up to 3 days ahead; cover and chill. Garnish with cream up to 6 hours before serving; cover and chill until serving.

2 Comments

Filed under Kitchen Adventures

Kitchen Adventures: Chunky Apple Cake

This weekend, I decided to make a feast for my sister and her visiting high school friends. Not only did I want to welcome them with hospitality, but I really wanted an excuse to test out some of the Fall recipes I’ve been collecting in anticipation of a special occasion. My homey meal was easy to prepare in advance and turned out to be a big success. My menu consisted of an array of cold-weather recipes: pesto hummus and warm sourdough breadsinister apple cider cocktails, spicy turkey sausage lasagna (my favorite lasagna in the world) and salad. But the greatest hit was the finale: my chunky apple cake with cinnamon whipped cream. 

Chunky Apple Cake (pictured with cream cheese frosting)

When I was brainstorming the menu, I knew at the start that I wanted to serve a moist, apple fall cake. Most of the recipes I found online, though, required a spring-form pan (which I don’t have), cake flour (which I didn’t want to buy), or excessive spices (which can be nauseating). After days of perusing through blogs and websites, I came across this simple one sheet apple cake that required nothing more than a bit of mixing and spreading in a rectangular pan – my kind of no fuss process. The recipe calls for cream cheese frosting, which happens to be one of my favorite things on earth, but considering the heavy meal I was serving I decided to go with a lighter topping and concocted my own cinnamon whipped cream. After tasting the deliciously light combination, I couldn’t imagine the cake with any other accompaniment.

with melted whipped cream

The best part about this recipe is that it’s about 1/3 batter to 2/3 apple chunks, which leads me to believe it’s healthier than the average cake. The batter is thicker than a regular cake batter, but when mixed with the apple chunks, it tends to thin out, making it easy to spread in the pan. I suggest preserving the cake in the refrigerator and either warming in the oven (350 degrees for about 5 minutes) or the microwave when ready to serve. Or, if you prefer like me, you can eat it cold! Considering the ease of this recipe and the rave reviews it received, I will definitely replicate it for my family over Thanksgiving – it’s a simple, lighter alternative to apple pie.

thick batter loosens up with addition of apples

batter in pan

finished product!

Apple Cake (adapted from Southern Living Magazine): 

  • 1/2 cup butter, melted
  • 2 cups sugar
  • 2 large eggs
  • 1 teaspoon vanilla extract
  • 2 cups all-purpose flour
  • 1 teaspoon baking soda
  • 1 teaspoon salt
  • 2 teaspoons ground cinnamon
  • 4 Granny Smith apples, peeled and chopped in chunks
  • 1 cup chopped walnuts, toasted

Stir together first 4 ingredients in a large bowl until blended. Combine flour and next 3 ingredients; add to butter mixture, stirring until blended. Stir in apple slices and 1 cup walnuts. Spread into a greased 13- x 9-inch pan. Bake at 350° for 45 minutes or until a wooden pick inserted in center comes out clean. Cool completely in pan on a wire rack. Dollop with cinnamon whipped cream (below); sprinkle with walnuts, if desired.

Cinnamon Whipped Cream

  • 8 oz heavy whipping cream
  • 1/2 teaspoon of cinnamon
  • 1/2 teaspoon of vanilla
  • 1/4 cup of powdered sugar
Pour all ingredients into a cold stainless steel mixing bowl; blend on high until stiff peaks form.
Recipe Grade: A+

3 Comments

Filed under Kitchen Adventures

Kitchen Adventures: Pumpkin Chocolate Chip Cookies

One of my favorite things about hanging out with my college friends is that more often than not, a collaborative baking session ensues. A good chunk of my energy at UC Davis was devoted to baked goods – whether it was sampling the campus Coffee House’s amazing assortment of cookies, serving massive slices of tray-pan cake to student customers, or trying new recipes with my roommates, I constantly surrounded myself with the products of flour, sugar, butter, and love.  Consequently, I associate my college friends with delicious treats.

Baking at Millerton, apartment senior year

I was lucky enough to have my old college roommate Amy staying with me this week, so as expected, we planned a little baking party. We had a good excuse, too – we were visiting our friends in DC for the weekend, who, like Amy, were running the marathon and needed nothing more than carbs to prepare them for the race.

Amy, Sous-Chef in training

If I’m baking in the Fall or Winter, I try to use recipes with seasonal ingredients, and came across the perfect one while browsing mybakingaddiction.com: pumpkin chocolate chip cookies. Anything with pumpkin is almost guaranteed to be moist and on the healthier side. With the creamy consistency of pureed pumpkin, overloads of butter and oil aren’t necessary to combine the ingredients, and sugar is only added to bring out pumpkin’s natural sweetness. The recipe was quick, easy, and easy to whip together with cabinet staples. We doubled it and made over 60 2-inch cookies.

soft chocolate chip cookies

After tasting the cookie dough I knew these would be a hit, but eating them right out of the oven, out of the fridge, and even two days later out of a plastic bag, I was able to verify the recipe’s trustiness. These cookies are soft, moist, chewy, cake-like, subtly sweet and balanced in chocolate-pumpkin flavor. I recommend storing them in the refrigerator to prolong their life cycle. I will definitely make them again before the end of the holiday season!

Pumpkin Chocolate Chip Cookies (from allrecipes.com and mybakingaddiction.com)

Ingredients

  • 1 cup canned pumpkin
  • 1 cup white sugar
  • 1/2 cup vegetable oil
  • 1 egg
  • 2 cups all-purpose flour
  • 2 teaspoons baking powder
  • 2 teaspoons ground cinnamon
  • 1/2 teaspoon salt
  • 1 teaspoon baking soda
  • 1 teaspoon milk
  • 1 tablespoon vanilla extract
  • 2 cups semisweet chocolate chips

Directions

  1. Combine pumpkin, sugar, vegetable oil, and egg. In a separate bowl, stir together flour, baking powder, ground cinnamon, and salt. Dissolve the baking soda with the milk and stir in dry ingredients. Add flour mixture to pumpkin mixture and mix well.
  2. Add vanilla, chocolate chips and nuts.
  3. Drop by spoonful on greased cookie sheet and bake at 350 degrees F  for approximately 10 minutes or until lightly brown and firm.

6 Comments

Filed under Kitchen Adventures

Kitchen Adventures: Banana Bread!

Banana bread is one of my favorite things to bake because it turns bananas that would otherwise be ready for the garbage into a glorious breakfast, midday snack, or dessert. Banana bread is best when made with super ripe bananas (to the point of being black) because ripening allows their sweetness and unique tropical flavor to fully develop.

Ready for bread!

I’d show you a picture of what the unpeeled bananas looked like, but I’d rather not run the risk of offending someone sensitive to unsightly food. If you have bananas ripe enough for baking, but you’re not ready for baking labor, stick them in the freezer, and thaw in the microwave when you’ve mustered up the energy to dust your kitchen up with flour.

I love testing out recipes for classic baked goods, but after much banana bread trial and error, I found no purpose in continuing to test. Martha Stewart’s recipe is by far my favorite, and it’s just not worth risking its quality and deliciousness to try another. I’ve found that the secret to her moist banana bread, in addition to ripe bananas, is sour cream. Her recipe calls for a half a cup, and the remaining ingredients are basic: flour, sugar, vanilla, salt, eggs, butter, and baking soda. After a few simple steps and some movement of the hand mixer, a beautiful, cake colored batter is ready for a buttered loaf pan and bakes in a 350 degree oven for just over an hour.

Before

After

This banana bread develops a crispy, buttery crust that when peeled gives way to a soft, moist, flavorful center. More often than not, I’ll throw in a half bag of semi-sweet chocolate chips to add some texture and of course, chocolatey decadence. Though after smelling this baking you’ll want to tear it apart right out of the oven, it keeps for months in the freezer if it needs to be preserved. If you have two pans and enough bananas lying around, I’d suggest making two loaves and keeping one in the freezer in preparation for company – it only takes 6 hours or so to reach room temperature.

Finished product

This bread is perfect as is, but if you really want to taste something over the top, spread atop a slab of salted butter while it’s still warm. They don’t call it bread for nothing, right?

Grade: A

Leave a comment

Filed under Kitchen Adventures